Houdini - IPOPs Particles AOVs for Karma CPU & XPU! [Karma Materials]
- Sharan Vaswani

- Jul 15, 2024
- 6 min read
I'm excited to share with you a toolset that I've recently developed to help streamline and enhance your Houdini workflow. As someone who has spent years in the industry, working on projects ranging from blockbuster films to intricate visual effects, I know how important it is to have the right tools at your fingertips. That's why I created the IPOPs Toolset – a collection of over 70 HDAs (Houdini Digital Assets) designed to simplify complex tasks and unleash your creativity.
Whether you're a seasoned pro or just starting, the IPOPs Toolset has something for everyone. These tools allow you to generate AOVs or Image Planes, and achieve stunning results with ease. In this guide, I'll take you through the process of using the IPOPs Toolset step by step, from installation to advanced techniques for Particles AOVs using Karma Materials.
Let's dive right in and explore the endless possibilities that IPOPs can bring to your projects. I'm thrilled to have you on this journey and can't wait to see what you'll create!
IPOPs in Production
While the video provides a brief overview of the Toolset features and its functionality in production, I will delve into a comprehensive, step-by-step guide on how it works.
Simple Scene Setup
I have a scene setup of a magic particle simulation, we will generate some interesting AOVs in a few easy steps and take a look at how to adjust them.

Basic stage configuration with the Magic Particles assigned a default karma material.

The LOP Network Camera has been brought into the Object Level.

Step 1: Scene Controller
To begin, we will create a "Scene Controller" Object Node, which will inform the IPOPs toolset about the material type in use and assist the Geometry AOV Bundle in selecting the appropriate viewer camera through the camera input. All IPOPs SOPs are connected to the Scene Controller, enabling you to make setting adjustments from a centralized location.

Step 2: IPOPs Particles AOVs Bundle Maker SOP
Next dive inside your geometry object and put down the IPOPS Particles AOV Bundle Maker. Connect that to the node you want to render and in the parameters press "Create Nulls", this will create three nulls. The "render_out" null is the final null to be used for rendering, the "export" null bakes all the settings into attributes that can be exported for other renderers and the "viz" null is a visualizer for a quick preview of your settings.

Step 3: Import your Particles in LOPs
You can copy the path to the "render_out" and go to the /stage, in the sopimport you can paste the path. We have now imported our magic particles with the IPOPs settings.
Step 4: Adding AOVs to the Shader
Now let us jump to the Karma Material where we can dive inside the "magic_particles" material and create an IPOPs Particles AOV Bundle. In the parameter press the "Create Output" button, this will automatically hook a Karma AOV node to the output and rename it to "all_aovs". The "all_aovs" is just a passthrough AOV and will render blank, however, it will carry all the important AOVs information for Karma.

Step 5: Enabling AOVs Render Vars for Karma
To finish the setup, we must navigate to the Karma Render LOP and insert an IPOPs Particles Render Vars node just before it. This node enables users to activate the AOVs they wish to utilize in their renders.
That's all! We are ready to start adjusting the settings!

Before we get to adjusting settings in the Karma Materials, let's see the SOP node IPOPs Particles AOVs Bundle Maker. This node allows the user to see some basic AOV settings directly in the viewport as well as fiddle around with various looks. Some of the settings can be transferred directly to the shader so that one shader is reusable for various geometries.
Step 6: Adjusting settings on the SOP Context

Use The "viz" null, which shows the "__uv", "__position", "__rest". These AOVs are crucial in the composition, so make sure they are generated correctly here before moving on to rendering.
First, we will adjust the "pscale" attribute. If you already have a "pscale" attribute on your cache before appending the IPOPs Particles AOVs Bundle Maker, then it will use your existing attribute otherwise it will create the values. We have two settings, you can either randomize the pscale or use a set value.

Now, we will modify the "__sizeMap_01" and "__sizeMap_02" to create AOVs according to the particles' sizes. Specify the minimum and maximum sizes for the ramp effect. This adjustment will enable compositors to separate groups of particles that are either too small or too large, allowing them to handle them appropriately.

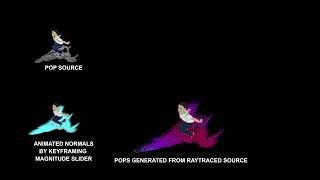
It is now possible to adjust "__varMap_01" and "__varMap_02". These AOVs assign random RGB values to particles according to their id. If there is no id attribute, the HDA will automatically use the point number as the id. These AOVs are beneficial for compositors to introduce variations in glows, color correction, or reduce particle counts in the composition.

Before running the simulation, the "__varMap_03" is created. By placing the IPOPs that create varMap on the emitter, a noise pattern will be generated which can be utilized after the simulation to group particles. You can add the varMap_03 as a Cd value or use it directly as the "varMap_03" attribute.

Height RGB enables compositors to manipulate characters as they move along the Y axis. Similar to Z Depth, the height pass can be useful in different scenarios. You have the choice between two options: Static Bound, which features a fixed height ramp for the character to traverse, or Dynamic Bound, which adjusts the ramp based on the character's Bounding box.

The Radial Pass is an RGB effect that operates based on a radial position. By setting the minimum and maximum radius, you can generate a circular fade effect. This feature is particularly useful when working on effects involving central cores, sources, and more.


The Mask AOVs operate in a manner akin to the Attribute Transfer SOP found in shaders, enabling the swift creation of masks for shading maps, and are rooted in SDF. This enables us to establish a core at the original source location and incorporate flow effects.

The Velocity & Velocity RGB Pass serves as a "speed map" in compositing. It is beneficial for emphasizing specific areas in the composition related to speed, such as creating glows in fast-moving sections of a mesh or enhancing specular highlights for rapidly moving water splashes. This feature is particularly useful in Magical Fx.

AOVs are employed to aid in compositing by introducing breakups and details in various situations. The use of two noise passes enables the incorporation of both high and low-frequency noise, which can be applied to UVs or Rest Positions to ensure uniformity and avoid noise variations per frame.

The Motion Vector AOV quickly generates motion vectors for compositing.
Step 7: Adjusting the AOVs within the Shader itself
Now let's move on to adjusting these AOVs in the Shader itself.
To begin with, we should activate the different passes that we want to utilize. Rest assured, we can fine-tune the appearance afterwards.


Note: Use the "Use Attributes" to import the SOP settings to the shader anytime you want.
With the Shader IPOPs Particles AOV Bundle, you have the flexibility to customize each parameter according to your requirements or inherit them from the SOP settings. Enabling "Use Attributes" on any tab will result in inheriting the attributes specific to that AOV.


Furthermore, it is possible to generate various fresnel AOVs directly within the shader. This is particularly beneficial when dealing with close-up particles or when rendering particles at a large scale. When determining the correct IOR value for your material, you have the option to choose a specific IOR value or utilize our IPOPs IOR Materials to access presets that can be entered into the "ior" parameter on the HDA. This functionality is advantageous as it allows for the same IOR value to be applied to your MaterialX Standard Surface for specular reflections.

Likewise, we can create a transmission vector, transmission light, and reflection vector.

The XRay Pass is a useful AOV that can effectively mimic rim lights, create a silhouette for particles, or enhance edges in compositing. It offers the flexibility to produce intriguing edges and gradients. Furthermore, this shader includes extra color correction options like exposure and contrast to enhance the overall appearance.

The Ambient Occlusion pass is highly valuable and essential in most situations. Nevertheless, at present, MaterialX only provides support for Ambient Occlusion in Karma CPU.

The purpose of the Edge Detect Pass is to replicate Nuke's Edge Detect pass in a 3D environment. This feature assists compositors in swiftly identifying edges without experiencing frequent flickering, and it can also be utilized to highlight edges on a character.
Step 8: Fire your Renders!
We are ready to deliver at last! You can now hit the render button and use all these AOVs in Comp.


![Houdini - IPOPs Volumes AOVs for Karma CPU & XPU! [Karma Materials]](https://i.ytimg.com/vi/jxsof1ogU_A/maxresdefault.jpg)
![Houdini - IPOPs Particles AOVs for Karma CPU & XPU! [Karma Materials]](https://i.ytimg.com/vi/lhJFfNks8H8/maxresdefault.jpg)
![Houdini - IPOPs Geometry AOVs for Karma CPU & XPU! [Karma Materials]](https://i.ytimg.com/vi/UNdxYFrXUbU/maxresdefault.jpg)


Comentários